
This post covers the design and creation of the Floppy8, a microcomputer and cartridge system which fits inside a floppy drive.

To see it in action, checkout this video!
The Floppy8 plays 4K movies and games on custom cartridges, features wireless controllers, status lights, motorized cartridge ejection and more!
Similar to a Famicon or Super Nintendo, the cartridge sticks out, allowing the label to still be partially visible. The front button safely unmounts and ejects the cart when pressed. The RGB indicator LED flashes different colors for waiting, mounting, running and error states.
The wireless controllers are modified off-the-shelf NES clones which have a beige color and replaced d-pads along with extra added weights for that premium feel.
How (and why) I Made It
Please note: This post contains affiliate links to many of the parts used in this build!
If you're like me, you often find yourself browsing Ebay (the online auction site) for weird items in the middle of the night (the time that isn't day) . One evening, while searching for floppy drives, I came across this little gorgeous little guy
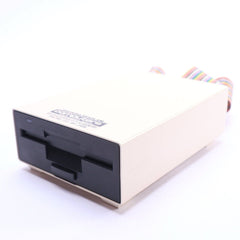

Strangely, the listing identified it as an Amiga 1010 disk drive. Maybe it is? But it doesn't look like one and I can not find anything that looks similar to it. The mystery intrigued me slightly, but the beautifully simple industrial design intrigued me more.
I was led to this disk drive that night by a growing fixation on physical media which had been bubbling inside me for the previous months. I began to realize that when you have the ability to watch any film or play any game in seconds... it removes some of the joy.
Not to mention, physical media which become tarnished or worn over years of love come to tell a story beyond the media contained within. There's a warmth to holding your favorite movie in your hands and that idea had led me to this drive.
The longer I laid there, basking in the bright white light of the photos of this mysterious Ebay floppy drive, the more I became obsessed. The texture of the front cover, the smooth shiny beige metal outside, the playful and complex rainbow ribbon cable. Before I knew it, I had spent much too much for a disk drive that had to travel much too far to arrive at my door.
Luckily, I was on a three week work trip while I waited the three weeks of shipping, so the time passed quickly and the question rattled in my brain "what do I do with such a satisfying device?" After all I don't own an Amiga and I don't intend to start, so what's a lad to do.
I came to the conclusion that the best use of this device was to pull the innards (as carefully as possible) and replace them with a framework of my own design which allowed the drive to be useful and fun for years to come.
But in 2022 we don't use floppy disks - they are much too impractical, so we'll need a new media, which means we'll need a new drive mechanism, which means we'll need the spirit of adventure because I have no idea how to do that.
Week 0: The Plan
I had a simple dream for this project...
- Design a new physical media format that hit a mix of nostalgia and practicality
- Mount some computer inside the case to read that media
- Design a drive that had a satisfying tactical feel when inserting a cartridge / floppy
- Replace the status LED
- Replace the mechanical front-eject button with one to eject the new cart type
- Leave all original pieces unmodified so they could be put back if needed
- Make it actually practical to use and enjoy!
On paper a simple task, in practice this project tested my patience and was one of the hardest things I've ever done. As someone who has never done any really practical 3D printing... or electrical engineering... or anything - we had a lot to tackle.
Week 1: It's real small
Once the drive finally arrived, I realized how small it really was (which implies that if it is some Amiga 1010 variant that it's probably a late model due to its scale).

The device shipped from Australia and still has a "Bruining Headlam Computers" sticker on it, I assume this is from when it was last serviced many decades ago. This did not help in solving the mystery of what this drive actually was, but I kept the sticker for nostalgia and to keep with my goal of being able to restore the drive to it's original state if needed.
Although it was about 105mm by 43mm and around 5" deep the real concern for me was the height of the floppy disk hole in the front cover. I knew I needed to retain this part so whatever new disk / cartridge format I invented would need to fit within this narrow slow. Luckily, this drive has a slightly taller than average hole, which allows our new cartridges about 4mm of height to play with.

The other mind-blowing thing was the amazing condition of the device. It looked almost new, with just a few hints of wear. I was as careful as possible to avoid new scratches, dings or other tarnish as I began work on the device.
Sadly over the weeks of working with this device, some of the paint around the front has some very small chips. This saddens me, but I'll be even more careful in the future.
Week 2: We need Cartridges
Before I could begin laying out any internals, I needed a sense of how the new physical media would work so designing the new media / floppy / cartridge (whatever you'd like to call it) was the top concern in the first few days. I needed to validate that I could manufacture something which was only 4mm tall and held some form of flash media and fit my aesthetic goals.
Initially, I thought I might retain the visual elements of a 3.5" floppy. I enlisted my brother to help develop our first idea - SD cards attached to custom circuit boards which looked like floppies but extended the SD card wires to an edge-connected pin set.


Wow! My brother's designs, visually, looked fantastic. They replicted the original disks very closely and they were easy to manufacture.
The simplicity was great, but I began to realize I needed something which lended itself well to a high-quality glossy label (more like a video game cart than a floppy) and more importantly, it needed to be made of a fairly soft material. I was worried that the sharp edges of a circuit board could damage the front cover of the drive. This concern, of doing this project non-destructively, held for the whole build. With the exception of the back sticker which was cut to reach a screw, this drive was never harmed and could be restored for historic value.
I investigated a few ideas to encase these circuits, but with only 4mm of space, I could never conquer an idea which fit all the requirements, so we moved to fully 3D printed carts.

The initial prototype was compelling. I used the free tool, Penpot to modify existing art for a game and printed a label on a cart I designed. Initially, I intended to use small USB flash memory sticks embedded in the cart, but I found that the square edges of a USB make it hard to align into a socket (more on this later). They were also slow when benchmarked and just kinda ugly. I would soon pivot to embedding micro SD cards in the 3D printed carts - which works well.
This was the first tangible element of the device I sometimes called the Floppy-puter or occasionally Floppy8. I designed the carts in the free browser-based, grade-school focused 3D modeling tool Tinkercad. I used this tool for all 3D models for this project.
While designing the carts, I purchased a small dye-sub printer, called the Polaroid Hi-print and fit the label indent on the cart to the photo size the printer produced. I also bought a small tool to round paper corners. Together along with my existing straight cutter, I was able to produce high-quality labels. Here is an overview of the whole cart creation process.
The cart design was finalized pretty quickly and aside from small fit tweaks the design stayed the same from early on. It was a nice constant to have and a good motivator to hold and look at during frustrating days.
Eventually, I would make a few carts of games or films I liked. I wanted to make them out of different filament as I loved the mismatched look of different colored 3.5" floppies and wanted to retain that.

Around this same time, I also began work on the software which would power the computer. I initially began with a Raspbian base (when I thought I would use a Raspberry Pi) and began customizing it to my liking, reducing the desktop UI, changing splash screens, etc.
I knew I would need a fair bit of logic to recognize the insertion of the carts, mount them, run an autostart, then once the program exited or the eject button was pressed it needed to attempt to safely kill the program (if that failed, non-safely kill it) then unmount the drive and trigger a servo to eject the cart. While this was happening it would also be updating the front LED to indicate the device's status.
Originally, I wrote the code as a bash script and this worked fine until I had many signals coming from different places (e.g. a program exit or eject button press may trigger the eject process). I eventually gave up and wrote the whole software stack in Node and used firmata to talk to the Arduino hardware.
In order to get the LED status to indicate an inserted, but unmounted cart, I used dmesg to read the kernel logs early and reflect insertion before the cart was mounted. I then used fairly straight forward logic to handle cart, LED, and program status.
The final setup requires each cart to have autostart.sh and an autokill.sh along with any binaries / media it needs. Ideally those scripts will boot the program then safely kill it once the eject button is pressed, but it will also force quit if the program hangs.
The software never changed much after this point, just tweaks to make it more reliable.
However, what did change a lot after this point was my approach to getting a Micro SD card reader to fit in the small gap inside the carts where the edge connector of the Micro SD card sticks out.

After buying and ripping apart a dozen or so SD card readers, I finally found this incredibly tiny USB-C reader which fits perfectly in the gap in the cart. Designing the rest of the drive bay would mean figuring out how to mount this card reader while also aligning the rest of the cart properly so it would smoothly insert when pushed in.
This wasn't that hard but did involve a lot of prototyping as tolerances on 3D printers are not great, so even though something was modeled to fit, that was no guarantee.
Week 3-6: So many unknowns...
Once I had a mostly-finished cart design I had to begin prototyping the computer, I knew I had a few big unknowns I had to explore. Some easier than others - but all challenges none-the-less.
- Is a Raspberry Pi powerful enough to do everything I want to do?
- How can I create an eject mechanism for the cartridges?
- How can I control the front-facing LED?
- Do I need fans?
- Will the metal case block wifi?
- How will I fit all the wires?
Let's start at the beginning...
Is a Raspberry Pi powerful enough to do everything I want to do?
No - they are not. My initial tests showed the Pi of barely being capable of playing 4K video and definitely not at an acceptable framerate. In my tests, emulator and game performance was terrible for anything but the oldest consoles. This made me question all the Raspberry Pi emulator devices around - either my hardware / software was just terrible or folks aren't really playing those devices much.
I ended up purchasing a Latte Panda 3 Delta - an obscure but really wonderful device. Aside from having a built-in Arduino, it also has headers for USB, power, and more. This made running wires for buttons, ports, lights, etc trivial and despite my constant wiring mistakes the board held up and worked really well.
In my tests the performance was really reasonable for a small single board computer and in many ways, I don't think the Floppy8 would exist without this device. Sure other single board options exist, but the Latte Panda was really perfect. The only complaint I have is that documentation is minimal, but because the hardware is basically an x86 machine with an embedded Arduino in a tiny package, I did not feel the need for complex docs.

Perhaps the luckiest element of this build was the fact that the Latte Panda just barely fit into the floppy drive. I printed this rose-gold plastic piece with the internal dimensions of the case to see the fit and as you can see, it is snug length-wise, but it sure fits.
How can I create an eject mechanism for the cartridges?
I knew early on that I wanted the device to be able to "eject" carts. I experimented with many types of spring-loaded mechanisms, latches, etc but in the end I ended up simply placing a servo with a cog which rotates and pushes the cart out. The actual implementation was simple, but getting power to the servo was tricky. I tried various electircal-engineery ways to get a high amperage 5v line for the servo, but nothing worked. At one point I thought I'd put a battery pack inside the device which would be kept charged and used only for the high-amp spikes for the servo, but somehow in testing I managed to miswire that and burn up the servo. So my final decision was to pull from the 5v line on the LattePanda but put a 0.4amp fuse to protect the board in the case of a jammed servo causing an amperage spike and harming the board. In practice this has worked perfectly fine and despite jams / etc the fuse has never tripped and the board has never shown any issue.

How can I control the front-facing LED?
Controlling an RGB LED is, apparently, trivial.

After soldering up some resistors (for some reason, idk it's what the internet said) you can control the colors straight from a couple PWM pins on an Arduino. This worked quickly and reliably. The terrible mess pictured above was replaced by a nicer heat-shrunk LED later, but the first attempt also worked, it was just ugly.
Do I need fans?
Early on, I did some heat stress testing by placing the Latte Panda inside the case and completely blocking the front and back with scrap plastic.

I let the device sit playing 4K video for several hours. The Latte Panda kept a steady 69c internal temp. Warm, but reasonable. The metal case works as a decent radiator and helps expell the warmth into the surrounding air. This was not completely similar to the final build, but it was close enough that I was confident the onboard fan would keep the device cool enough.
Eventually I printed a heat sensitive cartridge, placed it in the front slot and let the device run for a while.

This was not informative, but it was cool to look at.
Will the metal case block wifi?
This is a quick one - no. Nice.
How will I fit all the wires?
I ended up crimping many custom wires for this project. I invested in some nice wire for another project and used it all over this one. I also bought a wire-stripper and a crimp kit. The most critical and difficult wire to create was the short USB-C wire which attached the Micro SD reader for the carts to the USB headers on the Latte Panda.

This required soldering to a small USB-C female port.

Most of the other wires were simple - just short :)
Week 7-10: 3D Printing!
As the prototyping of core elements began to subside it became time to begin iterating on the most complex element of the Floppy8, the designs for the internal brackets / drive which would actually hold all the components securely.

As I mentioned before, I used Tinkercad for all the CAD work. This screenshot shows a small percentage of all the digital artifacts of this build. In total I would design and print 201 STL files for this project. Slowly tweaking and iterating fits, tolerance, feels - not to mention iterating on the overall designs as needs came up.
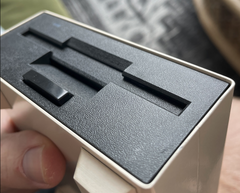
I've never 3D printed anything which required multiple parts so figuring out how to make parts which could be screwed together and hold strongly took time. The final internal design uses 11 parts...
- Button (Dark Grey) - This is used to replace the stock front button with one which has a short throw and flairs at the bottom.
- Button Mount (Orange) - This bracket holds the small circuit board which the front button is mounted to.
- Cover Mount (Red) - The original front cover and the button mount screw to this bracket. It has additional holes to attach it to the cart shifter.
- Cart Shifter (Light Blue) - This L shaped piece has two feet on the backside which the Latte Panda rests on and a slight slope on the front to help shift the cart upward and into the actual bay.
- Drive Bay (Brown) - This holds the actual cart when inserted along with the Micro SD card reader. It also serves as a mount for the Servo bracket (Pink) and LED bracket (Light Purple / Beige).
- Servo Bracket (Pink) - This bracket holds the micro-sized servo and screws to the Drive Bay and Cover Mount to add rigidity.
- LED Bracket (Beige and Light Purple) - This wraps about the LED assembly and holds it against the Cover Mount while being screwed to the Drive Bay.
- Rear Bracket (Yellow) - This bracket has the feet for the rear Latte Panda screw holes and also has a mount point for the power switch in the top left. It also has screw holes for the back cover.
- Back Cover (Green) - This cover / vent serve as the back plate for the device.
- Port Cover (Orange) - This removable port cover has carefully cut holes for the USB-C and HDMI ports on the Latte panda, but because the ports are a bit sunk into the device, the piece pops out in case the cables need to go deeper than the plate allows.
- Metal Rods (Dark Grey) - These pieces are made from 3mm risers which have been screwed together to the proper length, then sealed in heat-shrink tubing. They are included in the model for context.
It's worth nothing all the parts are printed without supports except the Cover Mount which has those small corners cut out to allow for the heads of screws to attach to the metal riser rods. As that corner is an unsupported overhand on two sides, it needed supports.
Week 11: Assembly
As I printed I would attempt to put pieces together, iterate, print again. I learned to design pieces to be small to save print time and slowly over weeks the device started to emerge.

With some assembly working correctly, I was able to check how the Floppy8 would feel with a cart inserted. I wanted it to resemble a Super Nintendo or a Famicom, with the cart label still visible when inserted.

One of the last elements to sort out was how to mount the internal switch for the front button (and how to replace the front button with one which matched the plastic of the front cover). I tried various options to recreate the visible element of the button, I tried making a mold and casting it in resin, etc. I eventually just printed it and resigned to sanding it smooth. I also found these adorable PCBs on Amazon which are perfect to mount a single button.

I like this close up because it helps to show how fucked up projects are when you look at them up close. In real life the Floppy8 looks fantastic because it fits in the original shell, but up close the internals have lots of bits which were printed bad or screw holes I had to drill out or whatever. These things aren't as perfect as photos make them look, so don't get down on yourself if your project isn't perfect.
Anyway, after getting these last elements sorted the whole thing felt fantastic to me - it felt real. I kept iterating then one day, like the flip of a switch, I realized we were almost done. I reprinted all the existing parts in black to help reduce unintended internal LED glow and began putting together the final bits.

Putting all the pieces together, including a lot of wire crimping, we ended up with a functional but unhoused Floppy8.
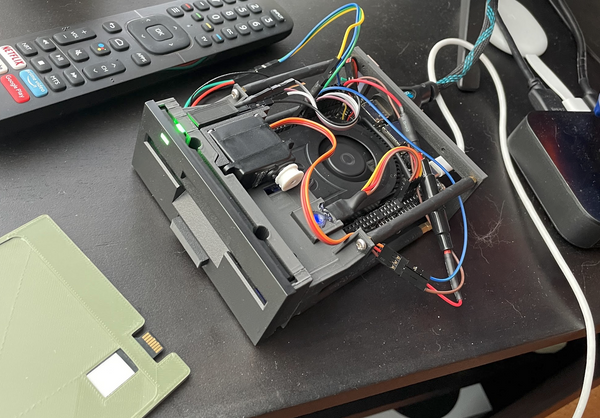
Testing at this point confirmed that our cartridges were read, the servo ejects them, the LED reflects the status, it all worked. Perhaps amazingly it also all fit in the case.
Week 12: Final Polish and Controllers
As the final bits and bobs began to line up I was finally able to do some real testing for heat, cartridge seating, and ~vibe~.
Heat wise, amazingly, even with all the junk in the case the Latte Panda stayed cool. However, there are some air vents directly below the cartridge slot which pump a lot of heat up around the cart. Originally the SD cart reader was mounted in the place with hot glue... you can see where this is going.
Aside from dripping glue down onto the Panda (which luckily missed the fan by a few mil) the glue was also prone to shifting over the course of a long gaming session or film. I redesigned the cartridge slot as two parts, one which aligns the carts and one which firmly holds the SD reader.

This redesign made the feel of inserting a cart way better.
I also took this opportunity to work on input devices! I picked up this pair of clone NES controllers. I also purchase the official Nintendo Switch Bluetooth NES controllers, but the after-market clones are actually beige, not grey like the official ones - so I opted to go with those.

I made a few small modifications to the controllers. I replaced the cheap looking matte d-pad with the one from the official controllers so it had the imprinted arrows and felt more premium. Then I took a note out of the book of toy-makers I added a bunch of weight to the controller to make it feel more real.

I glued in a ton of ball bearings and tbh this makes way more difference than you'd think! The other very small detail was the light bleed from the connection LED.

This small detail highlighted the cheapness / thinness of the plastic, so I used a small piece of heat-shrink tubing around the LED to help focus the light.

It's another super tiny detail, but it makes everything feel more polished.
I also purchased a replacement Fire TV remote (which is just bluetooth and works great with Linux) along with an after-market beige shell for it.

Sadly the shell is shipping from China and has a ~2mo wide delivery window. So it hasn't arrived yet. When it does, I'll look into removing branding from the remote's buttons and replacing the shell so we have a proper remote! I considered buying an actual old beige remote, but they realistically didn't have all the buttons I wanted, but if I find the right one, I may migrate the insides of the Fire TV remote to a whole new home in something truly retro!
Anyway, we're done...
Finally after weeks of tweaking, ups and down, frustrations and almost giving up at least once a day for weeks, it was done.

I was able to sit, watch a film, play a game, etc. I made a lot of mistakes, wasted a lot of filament, but at the end of the day I'm very proud that I kept pushing and didn't give up. I'll probably never use the Floppy8 much, but I'm proud to have it on my desk.

Thanks for reading and happy hacking!